
Last year I wrote an article about the 5 questions you need to ask yourself before starting your programming blog, and I hope you decided to start one!
Writing blog posts without having a plan, template or structure at hand can take forever. Especially when you’re new to the whole thing, you might have troubles creating a smooth writing process.
This blog post aims to aid you! I’ll explain the essential parts a blog post traditionally includes, how it’s structured and also what else you can do to make your text more appealing to your audience.
Write a clear and interesting headline
Every blog post needs a good caption! Think about a short one which tells readers immediately what your text is all about. After all: people don’t have much time to read and the internet’s full of content, so make sure to speak to them understandably.
Also, you need to keep your promise! If your title says “5 tricks in PHPStorm that will change your life” and you only write about things everybody knows already, you won’t be changing any lives.
Don’t get me wrong – you can write clickbait headings, there’s nothing wrong with that as long as the content fulfills the readers’ expectations.
Plus: Make sure the headline is the only H1 Tag on your article’s page!
Create an outline
Before you start writing your blog post, you should create an outline to help you arrange your thoughts reasonably
Write subheadlines to guide your readers
Now that you’ve written the outline it should be straight-forward to convert your list items into subheadlines. Again, they must speak for themselves, and your readers should know what awaits them in the following paragraphs just by scanning over your headings.
Often people decide if an article is worth their time by reading the subheadlines first, so make sure to spike their interest!
Untangle your thoughts and create content
Now it’s time to get your ideas out of your head and onto your computer screen!
For each subheadline write down what you want to say – if you already collected your ideas while creating the outline, you may have a more comfortable time.
Make sure to stay consistent in your writing and keep your users in mind! Avoid hopping from one thought to the next and back again, and therefore creating an impenetrable thought-thicket for your audience. They won’t arrive with a machete at your blog, so make it easy for them to follow your process.
If you’re having a hard time getting your thoughts down in an orderly fashion (which is totally normal—embrace the chaos!) try using systems. For example, structure your paragraphs like this:
- statement
- substantiation
- example
Or create something more fitting for your theme to follow along. Something like this:
- people’s problem
- example (everything’s miserable)
- my solution
- example (everything’s great again)
But: you don’t need a method to write good articles. But it might help you out, especially at the beginning of your blogging live. Soon you’ll be able to break out of the system, without hurting your text’s comprehensibility.

Photo by Robert Bye on Unsplash
We can find structures in every part of our lives – some of them were intentionally created, some by accident. However, they help us in many different ways.
Break up text
Let’s look at some ways to structure your blog post on a deeper level and make it more appealing!
Include images
You don’t need to include images if you don’t think it’s necessary. But keep in mind, that an image can make a huge difference to the look and feel of your article!
If you don’t display code, videos or other media and your post has more than ~500 words, I encourage you to include a graphic, screenshot, a photo you took or a stock-image (be aware of and check copyright!).
Images help to break up your text, so it doesn’t look overwhelming and chunky but interesting and digestible to your audience’s brains.
Insert a list or two
Who does NOT love lists? Even search engines love lists!
Ordered or unordered lists are not only a refreshing sight for your readers’ eyes but also a great way to deliver information short and precisely. To make this work you have to make sure to be consistent though:
Don’t:
… I’ve learned that:
- there are no limits to the sky
- I recognized that other people like my sweater
- Can you even lift?
Do:
… I’ve learned that:
- there are no limits to the sky
- people like my sweater
- “Can you even lift?” is a legit question
Use different font styles
You can emphasize your writing by using different font styles which is also pleasing for your readers’ eyes and brains.
Use bold text to highlight essential points – this is super useful for users who scan over your article. Bold text acts as an eyecatcher and should cover the crucial information you want to convey.
You can use the italic style to emphasize a specific word. Most people know this from reading books: italicized words get pronounced differently in your head! Let’s look at this example:
It was my idea after all.
Did you naturally emphasize ‘my’ while reading the sentence above?
Create deeper levels with more subheadlines
You are the master here, and you can add as many subheadlines as you need to structure your text. No one says you should only use H2 and H3 – feel free to create H2-H6 to your liking! But be aware not to produce an H1 in your blog post’s content because that heading is already reserved for the main title.
If you have many paragraphs beneath an H2, try to create some H3s to create subsections. If those sections consist of multiple paragraphs again, add H4s and so on. You’ll get a nicely structured document at the end, and your readers will be thankful.
Spice it up and add some links
If possible, see if you can link to another blog post of yours that is somewhat related. Your reader may be interested in reading more about a topic. Furthermore, you want your users to stay as long as possible on your blog, exploring your content!
Including external links to relevant articles from other sources is also good practice – especially if you used these sites for your research. It’s okay if you don’t want to set links to certain websites, e.g., a competitor of yours. Do as you wish, the choice is yours!
Draft an introduction and an ending
Some people find it easier to start with the introductory part of a blog post, and others do it at the very least. There’s no right or wrong way to do it, so do what feels best for you.
I put this part at the end because I write those parts when I’m done with the main content.
Introduce your audience to the topic
Your introduction may be only one or two paragraphs short, which doesn’t matter as long as it fulfills its role. In this part, you tell your readers about what you’re going to talk to them about, your why and motivation to write this thing up in the first place. Maybe also add in some details about how this post has something to do with your personal life – that may not be appropriate for all blogs, so see if it fits yours.
You may also include official numbers from statistics (add a link to the source!) to build trust
Dismiss your readers with style
Traditionally you include a short recap at the end of your article, repeat the most important points made, and maybe add some advice.
But you have way more possibilities!
Write some more about your opinion if you haven’t done so in your main content. Talk with your audience: Have they experienced something similar, and how did they handle problem X? This way it’s more likely for readers to leave a comment and start conversing with you and other commenters.
Congratulations, you made it through!
Now you know about the basics when structuring your blog posts and may already have spotted a thing or two you could enhance in your existing articles.
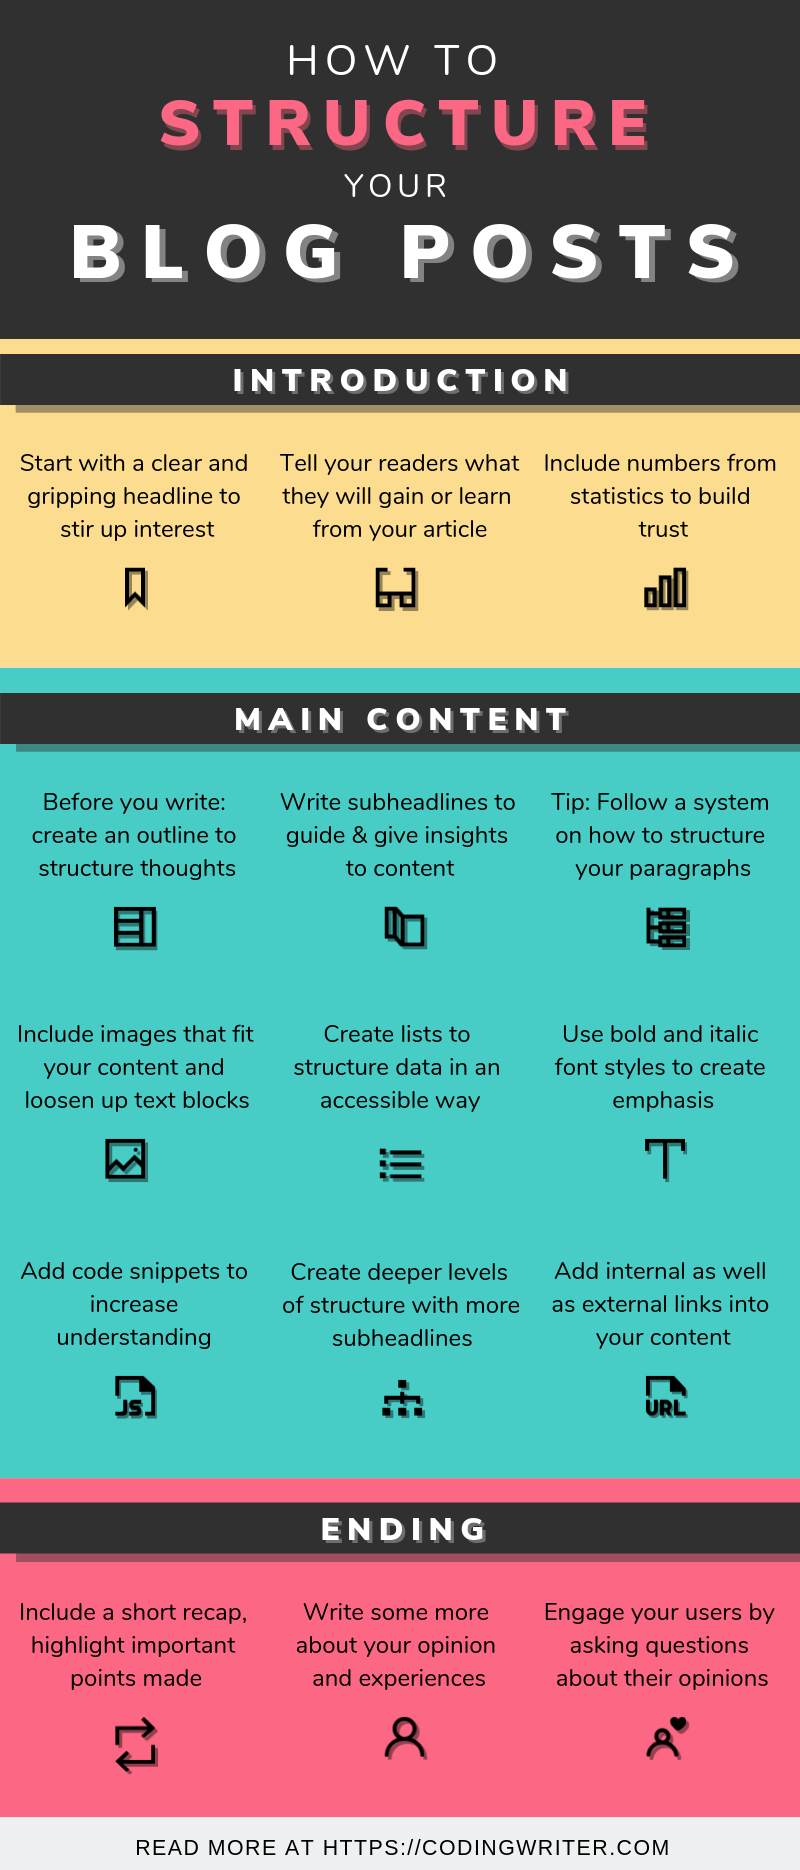
I’m planning to create a graphic for this blog post, a cheat sheet where you can see everything at a glance. I will update this post and tweet about it when it’s ready!


2 Responses
Thanks Sarah for this helpful article
Glad that my blog post could help you 🙂